
This
post will focus on painting tips, tricks and traps that have gone into
producing the figures you see on this blog. It will not necessarily be a ‘how
to paint’ guide, just the ideas I’ve used to achieve the results that you see
here.
Task
Workspace
This
seemingly inconsequential thought is in fact pretty important in my opinion.
The workspace I have is comfortable and readily accessible to get painting
completed. Ideally if you can get a space where you do not have to pack
everything away this works best. I find that even doing just small tasks of
10-20 mins here and there helps break up the ‘paint session’ type mentality
that can often be off putting. Four to five of those little 20 min sessions
really adds up and also enables you to come to the paint table with good focus
for a short period of time for a 'burst' of painting. Hours hard at it can lead
to sloppy work or at least drain the enthusiasm sometimes or worse still
prevent you from starting/resuming painting.
When using the Army Painter Quickshade and turps make sure you have good
ventilation – the stuff stinks and can’t be that good for you under your nose
for extended periods.
The
other great helper I find in getting through the lead pile is having a good
distraction! If you have a iPad or iPhone you can watch You tube videos or
listen to a podcast, perhaps a PC nearby to do a similar thing. This really
helps ease the painting sessions and in fact makes them something to look
forward to if you hold out for your favourite TV show or podcast to paint and
listen to.
Equipment
A
VERY well lit paint area or at least a spot light overhead makes a world of
difference to getting accuracy in painting. This cannot be emphasised enough. A
good selection of paint brushes of similar sizes so that you can jump from one
brush to the next to allow the other to dry after having been cleaned is
useful. This gives you control of the paint so that it does not run,
particularly when you are doing small detail work.
Preparation
After
fiddling with a number of ways of setting the figures up for painting I have
settled on mounting them on small round bases (washers would work also). I use
a tiny bit of super glue to secure them. The figure easily pops off no problem once the figure is finished. Putting multiple figures on a
single strip to me actually slows the painting down. It’s much easier to get accurate
control of a single figure in your hand and the round base enables you to roll
the figure around easily in your hand without touching the miniature. It also
is perfect for the final job of ‘dipping’ which is a critical step in the
process...mount them singly!
 |
| Dynastic Sumerian Armoured Cloak Spearmen |
When
painting I do it one unit at a time. I find that it’s easier and faster to
paint 40 figures than four lots of ten figures.....you get results as well. You
should organise the figure in rows on your paint desk by the same type of miniature
it is. That way you can produce variation in color of the same type of figure
to get a different look into the unit and at the same time you are painting the
same miniature so it eases the task once you have ‘learnt’ how to paint that
single figure ie you know the easiest way to paint the same detail one after
the other, and so on.
After
having them mounted, I then give them a dusting of white spray paint. Then hit
them with Army Painter Barbarian Flesh tone spray. Generally one coat will do
it. I then go back and ‘touch up’ areas I missed with a paint brush very
quickly and easily. Best to do this rather than spray the figure multiple times
as you’ll clag up the detail. This provides the base color for all other colors
to go on.
 |
| Note the shields based separately and horizontally. |
You
can actually buy a Warpaint matching color for Barbarian Flesh to get a perfect
match if desired. I've also used a paint-on color such as Vallejo
Beige Red to give much the same tone of flesh color after the army painting dip
(goop) is applied. All this then dries rock hard and the task of painting
begins. The Army Painter dip is very forgiving and you can mix the odd shade of
flesh on a figure with no ill effect - in fact, it can give you some natural
shading if done cleverly.
Painting!
The
first thing you’ll notice is that there are alot of very natural shades in the
figures on this blog. The armies of this period use mostly natural colors and
you really can’t go to far wrong sticking to browns, beiges, reds, off whites,
etc. For the most part I use the foundry paint system which
allows you to use triple shades of the same colors. This is very handy to get
variation from the same type of color and as a good example of this you can see the red shields on
the Sumerian spearmen following this principle. In this way I use the same triple
color to make sure the shields look similar but still different. Once again,
the goop will bind and tie all this together. As a guide the goop will darken the figure a bit so using lighter shades
is best to allow some natural shading to occur once the goop is applied and it
settles into the various folds and cracks in the figure.
When
painting the figure a good way to do it efficiently is by painting ‘inside to
outside’. By that I mean paint anything on the figure that can then be painted
over by the next layer up. A good example is the base coat. That is the bottom
layer. After that I usually paint the skirt, then the belting, followed by the
hair, helmet and the spear last. This means any blemishes can easily be painted
over with the next coat further to the ‘outside’ of the figure....this really speeds and eases the painting 'task'.
This
is a simple technique that is used by many painters but makes for very fast
painting and you need not be too precise in dark recesses on the figure as the
goop will naturally fall into those areas. You do however need to be accurate
with painting anything that the goop will not hide. For example, make the
belting ‘crisp and sharp’ so that the goop will sit in the cracks and the edges
that will show your accurate painting. It’s worth the extra effort and you get
better at painting the same figure after a while which is one reason to set the
figures up in a row by each type, to make you better at this ‘accurate’
painting. Small paint sessions for these detail tasks are useful to hold the
concentration.
To
do the sandals on the figure I simply run a brush with Windsor and Newton Peat
Brown into the detail on the figure - easy and very fast. When you goop
the figure it will bind it all together and you do not have to do any further
work on the feet of the miniature.
Bronze
of this period is a color that is often talked about. Essentially there is no ‘exact’ color. It varies depending on the composition of the tin and copper.
Anything from a brownish to a shinier color is fine. Polished bronze comes up
quite shiny. I like the browner shade and the color I particularly like is the
Formula P3 Rhulic Gold (excellent) and
Foundry 'Burnished Gold A' pot. Both these
colors paint over the flesh base coat color very nicely and take well to the
goop. These are my staple bronze colors achieving the desired look after they
have been gooped! I use the P3 paint for ‘less shiny’ items and the gold for
spear tips...though I do mix them as well! I occasionally use other variation
colors here and there just to create variety.
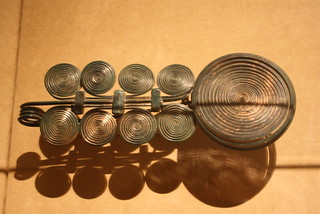 |
| a 'brownish' bronze color. |
Paint colors that I find that I use alot are highlighted on this chart.

As
you can see, the variation in shades of brown and red take the Army Painter dip
very well and are in keeping with the tones of this period (in my view). There
are quite a few varieties of colors so this helps ensure the units don't have a 'cooks cutter' look, but
do have a similar look achieving the desired 'organised city-state' force
effect look I like.
That
said, it is good to put in some variation in color other than basic browns,
beiges and off whites, etc. I find that the best way to do this is to goop the
figure and then paint on the other colors that don’t take to the Army Painter goop
technique that well - colors such as blue and Green, purple, etc are good
examples. The goop is a shiny surface so mat varnishing the area you wish to paint can help the application of the paint depending on its consistency, opacity, etc - experiment.
Armoured
Cloaks – these are some of the easiest and nicest Cutting Edge figures to paint
and also some of the most tedious! The basic paint job is very simple as there
is no belting on the figure and you can finish the miniature very quickly. I
found with the cloak, if you outline the cloak color on all the figures with a
smaller brush, you can very quickly go back with a big brush and fill in the
open surface of the cloak...very quick and it gives good consistent coverage easily.

When
the figure is painted you will have to decide whether you want to go to the
trouble of highlighting the ‘armoured bronze disc’ on the coat. I think it’s
worth the effort as these are iconic items of the Sumerian ‘look’. They look
good on-table and in the pics. To that end I found a way to speed it up and make
it bearable. Get yourself a good gold narrow tip paint pen. The type that
dispense paint that you write with. After the goop is applied (not before) you
dab the tip on top of the armoured cloak discs and your done (be careful not to press to hard otherwise the paint runs) .
 Depending
on the paint pen you may be able to do this before the dip but will lose the
impact as the goop will darken the gold effect.
The cloak discs are very well sculpted and this detail ‘stands up’ ready to be
painted on the Cutting Edge figure. Invariably you will make mistakes that you
can either ignore or paint over with the coat base color...your choice. Being
careful reduces the need for this afterwards. These gold dot on the cloaks are
perfect candidates for 2-3 small paint sessions as this job is tedious.
Depending
on the paint pen you may be able to do this before the dip but will lose the
impact as the goop will darken the gold effect.
The cloak discs are very well sculpted and this detail ‘stands up’ ready to be
painted on the Cutting Edge figure. Invariably you will make mistakes that you
can either ignore or paint over with the coat base color...your choice. Being
careful reduces the need for this afterwards. These gold dot on the cloaks are
perfect candidates for 2-3 small paint sessions as this job is tedious.
If
you prefer a shiny gold effect then you have to put the dots on after the
dulcote mat varnishing process. I think it looks best when dulcoted as the
effect is still obvious and the texture of the figure all blends in...it’s a
personal choice. One of the nice things about making the armoured cloak discs
‘pop out’ like this is that you get to see the fruits of your labour whenever you play as the cloaks
face you not your opponent...at least to start with!

Army
Painter Quickshade ‘goop’
Now
to the ‘easy’ and fun part....gooping! Up to this point the figures look very
basic and frankly pretty horrible! No fear, the goop is here.
There
are three shades of goop available. I use the mid tone shade for overall
coverage of my figures and occasionally use the dark shade tone as well. The
mid tone has more viscosity and the dark tone has less ie it is more ‘runny’.
The dark tone can be useful for areas with fine detail but I find it does
darken the figure a bit. I find that the soft tone is not that useful for these
armies as the contrast is not enough, but you could try it on some figures if
you have very light shaded colors. The mid tone shade is the best quick shade
to use.
I
put the word ‘easy’ in inverted commas for a reason. To get good results that
are consistent there is a technique that in my opinion is not the one they advise
for normal application of the Army Painter. The normal technique calls for you
to dip the figure in the Army painter pot and shake the figure then leave to
dry. I do not think that this gives the best results - at least not for these minis.
The
technique I use is application by brush – nothing scientific here, as many
others do the same. It is the best way in my view to get control of the goop
when applying it to the figure. One
important point to realise from the start is that the goop does ‘harden up’
relatively quickly. It takes hours to dry, but hardens quickly - Important point!
I never apply goop to more than 8 figures at a time. By the time I've done the
last figure the goop will have started to settle on the first miniatures and
then comes the important part. I do however do the entire unit at the same time - this is not a long process. Ensure you have set aside 30-45 mins for the unit of 40 figures to be gooped by this method.


Freshly gooped spearmen
The 'trick' is that you
must go back and ‘draw off’ the excess goop that invariably puddles in the
crevices in the figures and nearly always at the feet of the miniature as well, which is not immediately apparent when you first apply it. All looks well for a few minutes then it starts to 'puddle'
– pay attention to get the excess away from the feet and sandal detail. Goop
also sits around belting and in the ‘v neck’ area and the small of the back.....all very common
areas to pay attention to. These areas are hot spots to go back and draw of the
excess goop.
This point cannot be stressed too much as failure to do this will result in unsightly blobs of goop that really detracts from the finished figures. Take note!!
This point cannot be stressed too much as failure to do this will result in unsightly blobs of goop that really detracts from the finished figures. Take note!!
 |
| This looks pretty ugly up close! - note the puddling at the base of the feet and at the bottom of the fur cloak. |
 |
| Here you can see I removed the excess goop from the above figure, but left a bit on the cloak as a 'fur effect' - see below. |
At this 'gooping stage' one
of the tricks I use is to keep a pot of turpentine nearby. If you find the goop
settling and hardening in a place before you are able to draw off the surplus then
by wetting the brush with turps and applying it to the offending goop you will
be able to 'soften' and then 'draw it off'. You can also use this method to draw off goop from
items such as bows which has a goop puddling around the hand and then you
can ‘shade out’ to the tip where the turps lifts the goop and returns the base
color giving a nice blended effect - in this way you are 'working the goop' to
achieve an effect. These tips can only be done in the single session of
gooping, not after the figure is left to harden and drying. So to a degree you
do have some control over the ‘goop process’ whilst your applying the stuff
that can enhance the final effect. Its all quite painless and I think the best
part of the process.
After
the goop is dry, at least 6 hours but I usually leave them for a day or so to
be sure it is absolutely dry, the figure can then be touched up. This step can be left out as small details in massed units don't always show up, but I like to
go back and very quickly touch up spots that may be obscured or covered in such
as way that you want to highlight missed or obscured detail. Once again, this
is personal taste but I find this ‘last look’ before dulcoting enables small
blemishes to be fixed easily and gives the finished figures a nice consistent
look.
When
applying goop to items such as shields one method I use is to lie the shield or
figure horizontally so the goop puddles around the bosses on the shields. This
works better than the goop running down the face of the shield and puddling at
the bottom. When the goop settles, draw off the excess from the flat parts of
the shield and let the goop mostly puddle around the bosses. Once the shield is
finally mounted and dulcoated on the figure they you can paint the metal
bosses. This retains the metallic look of the paint and really makes the bosses
‘pop’ on those lovely big shields and gives an even coat to this large flat
surface.
 |
| Shields gooped lying flat - I actually bluetacked them to a small stand to make handling them easier. |
Another
technique that is very useful at this point, before mat varnishing, is to apply
washes. The Games Workshop Devlin Mud is a favourite. This can be applied in
areas where the goop hasn’t settled and can help even out the less than precise
goop method once it hardens. This is great for belting and
faces in particular. The wash can be easily worked and because the goop gives a
hard shell shiny coating to the base colors the ink is not absorbed into the
paint. The result is that the wash doesn’t change the color underneath and if
you mess it up it you can very easily 'draw off' the offending area with a cotton earbud or paint
brush. Inking OVER goop is a good precise way to apply washes.
 |
| These figures have been ever so slightly 'worked' with a wash around the belting and edging of the skin and sheepskin cloaks. Note, these are finished figures after having been mat coated. |
Yet another technique I use is to apply detailed geometric designs, albeit, quite simple, onto the figure after the goop is applied. Use a normal fine texta pen - .01mm. Similar to the ink, the pen paint or ink flows on the goop surface much more easily and if you make a mistake you can simply wipe it off and start again – you can't do this if you draw on the paint directly as the ink is absorbed into the paint. This way you can get fairly nice details easily to add a bit of variation to the figure, but in a painless way. Ensure this detail is completely dry before mat coating and do not 'paint' a mat coating on as it can smudge the pen-paint detail....use a spray mat varnish.
 |
| Note the geometric drawn pattern on the figure on the left. |
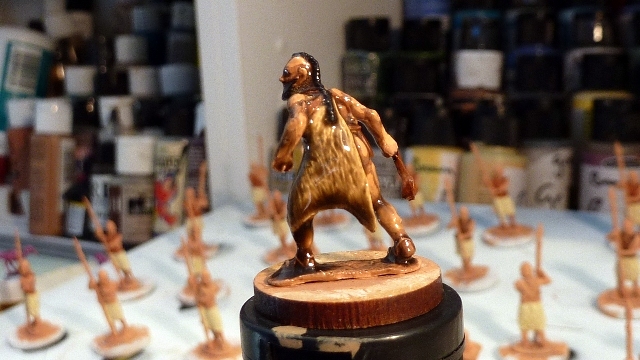
Fur coats feature in this period as Guti cloaks and Amorite shields. These can be tricky. The detail on the figure is slight so you need to be careful not to put too much paint on the figure during the base coat stage. When painting the fur the goop will be used to bring out the detail. So before gooping apply a base coat fur color, then dry brush very lightly to highlight the detail. Apply the goop as normal and then go back and use the ink which is very thin and 'push it around' to make sure you bring out the fur detail in the figure. You can also use the natural tendency of the goop and ink to puddle to your advantage by using it to create a ‘fur effect’ also.
 |
| Here the ink has been applied after the goop and 'worked around' to provide extra shading effects. |
|
| ..and here you see the goop puddled at the bottom of the cloak to create a 'fur effect' which naturally settles in the folds and detail. |
Experiment
with this to get the look that you like.
The important thing is to get the ink and goop to sit in the fur detail and bring
out a high contrast between the colors so you can see the fur effect. As a last
touch up AFTER the figure is dulcoated you can dry brush very lightly to make
the fur ‘pop’ that much more. You must do this on the mat surface after
dulcoating however as the shiny goop surface will not allow you to dry brush –
it just smudges. So for painting fur it is -
paint, drybrush, goop, ink, highlight....these are all easy and not tedious steps.
At
this point the figure still looks pretty ugly. It’s shiny and looks like it’ll
never look any good. Off course you know
that’s not the case and the wonders of Dulcote will knock the shine off the
figure when you spray it. I find it's best to spray once from the top when the
figures are still on their base, then pop them of their base and spray them on
one side and then the other. This should get rid of most of the shine. I
haven’t used it, but I believe the Army Painter Anti Shine will do pretty much
as good a job as dulcote and cost about half the price so might be worthwhile
trying out. I also have a pot of dulcote that I brush into hard to get at areas for a completely 'flat' finish.
 |
| Finished figures not yet based. |
Basing
My
basing is pretty simple. The base material I use are metal cuts made of 1.6mm Galv Steel. This is undercoated with a spray can color called yellow oxide, as this is close to my base color. I use a house paint color that matches my table
surface and use this to edge my metal bases. Then I apply
the paint with a touch of white glue mixed in, sprinkle on some woodland scenic
Burnt Grass in patches and then flock with a sand mix that includes small
rocks, ballast, etc for texture. After a few minutes of shaking off the texture, which by now has 'set' enough to stick to the base, I run my finger around the edge to get a crisp, sharp edge of flock right up to the base edges - nice an clean! It’s a very simple but effective base method that is fast and blends well with my gaming surface (which is the MKP desert mat). If I’m
feeling a touch inspired I’ll add some Silfor type grass effects, but not
always.
 |
| Step 1 - house paint plus PVA - leave goop around feet for a contrast. |
 |
| Step 2 - Burnt Grass course texture liberally 'dumped' on the base...then shaken off. |
 |
| Step 3 - sand mixture 'dumped' over the lot, shaken off. |
So
there you have it, my method for painting figures as you see them on this blog.
Quick, fast, and well protected from damage. The importance of the sculpt you
work with makes quite a difference as the goop highlights all the good and bad
things about the sculpt you use.


Fabulous! Thanks for the write-up, very useful.
ReplyDeleteWhat type of lighting and lens do you use for your photographs? they are very good.
Hi Jonathon,
DeleteThe camera is Panasonic Lumix DMC-TZ6. I take pics with natural morning light and also overhead 'down lights'. Sometimes to create an effect I might use a hand-held spot light.
I'm no expert by any stretch but just use trial and error - you only see the pics that turned out
:-)!
Great article -you've really used the Army Painter effectively on these figures and provided a great guide re the paints and techniques.
ReplyDeleteReally enjoying your blog and must get my Foundry Sumerian chariots castings out very soon I think.
Simon.
...glad you are enjoying the blog and thanks for the support....please do get those chariots out as I think they are a rare beast - I'd like to see them now that they might become available again.
DeleteCheers
HappyW
Excellent figures and tutorial! I'm a 15mm guy but when I go to 28mm, I have your page bookmarked. Thanks for sharing!
ReplyDeleteHi Monty,
DeleteThanks. The same techniques can off course be applied to any figures...maybe even 15mm which I haven't yet tried. This method does I believe give good results for the effort put in....there's nothing like getting it done!
Cheers
HappyW
Great instructions, painting and photos. Have you tried the AP acrylic inks? Has the same results but are not as toxic and dries faster then the petroleum based AP.
ReplyDeleteHi Cyrus,
DeleteThanks and I hope there's at least one useful idea in there for you :-)
I hadn't heard of the AP inks but on your recommendation I shall pick up some this week and give them a crack.
Thanks for the tip!
Cheers
HappyW
I have just used these techniques to paint my Egyptians and it worked perfectly - many thanks.
ReplyDeleteRaglan
Excellent my Lord!
DeleteDo you have any pics on a blog for a bit of a look-see?
Cheers
Happy W
Hello!
ReplyDeleteI really, really enjoy your blog and refer to it quite often.
Something I've been curious about though....why did you decide to go with bronze helmets as well as bronze discs on the shields and cloaks instead of copper? I prefer the bronze but am curious.
Larry,
ReplyDeleteSorry for not replying...it slipped past me. Apologies.
The 'bronze' is kind of the copper colour I prefer. There are various shades and looks to these metals and to me the metallic colour I settled on gave me the best aesthetic and to my eye, a representation of bronze viewed from afar after much campaigning i.e. not shiny and new.
The colour also takes an army dip painter wash very well.
Glad the blog is being of some use with the content thus far...
Regards
Happy W
No worries...I was just curious. Besides, I plan to do the same as you!
ReplyDeleteFunny you should reply when you did though, the day before I read that the copper helmets found by Wooley were actually a very early form of bronze!